Software Download
QGroundControl (PX4 flight controller tuning software)
Scan the QR code below for the Corvon Discord server.


One-Click Firmware Flashing
Copy the CORVON web flasher link and open it in Chrome or another browser that supports WebUSB.
https://flasher.corvon.tech/
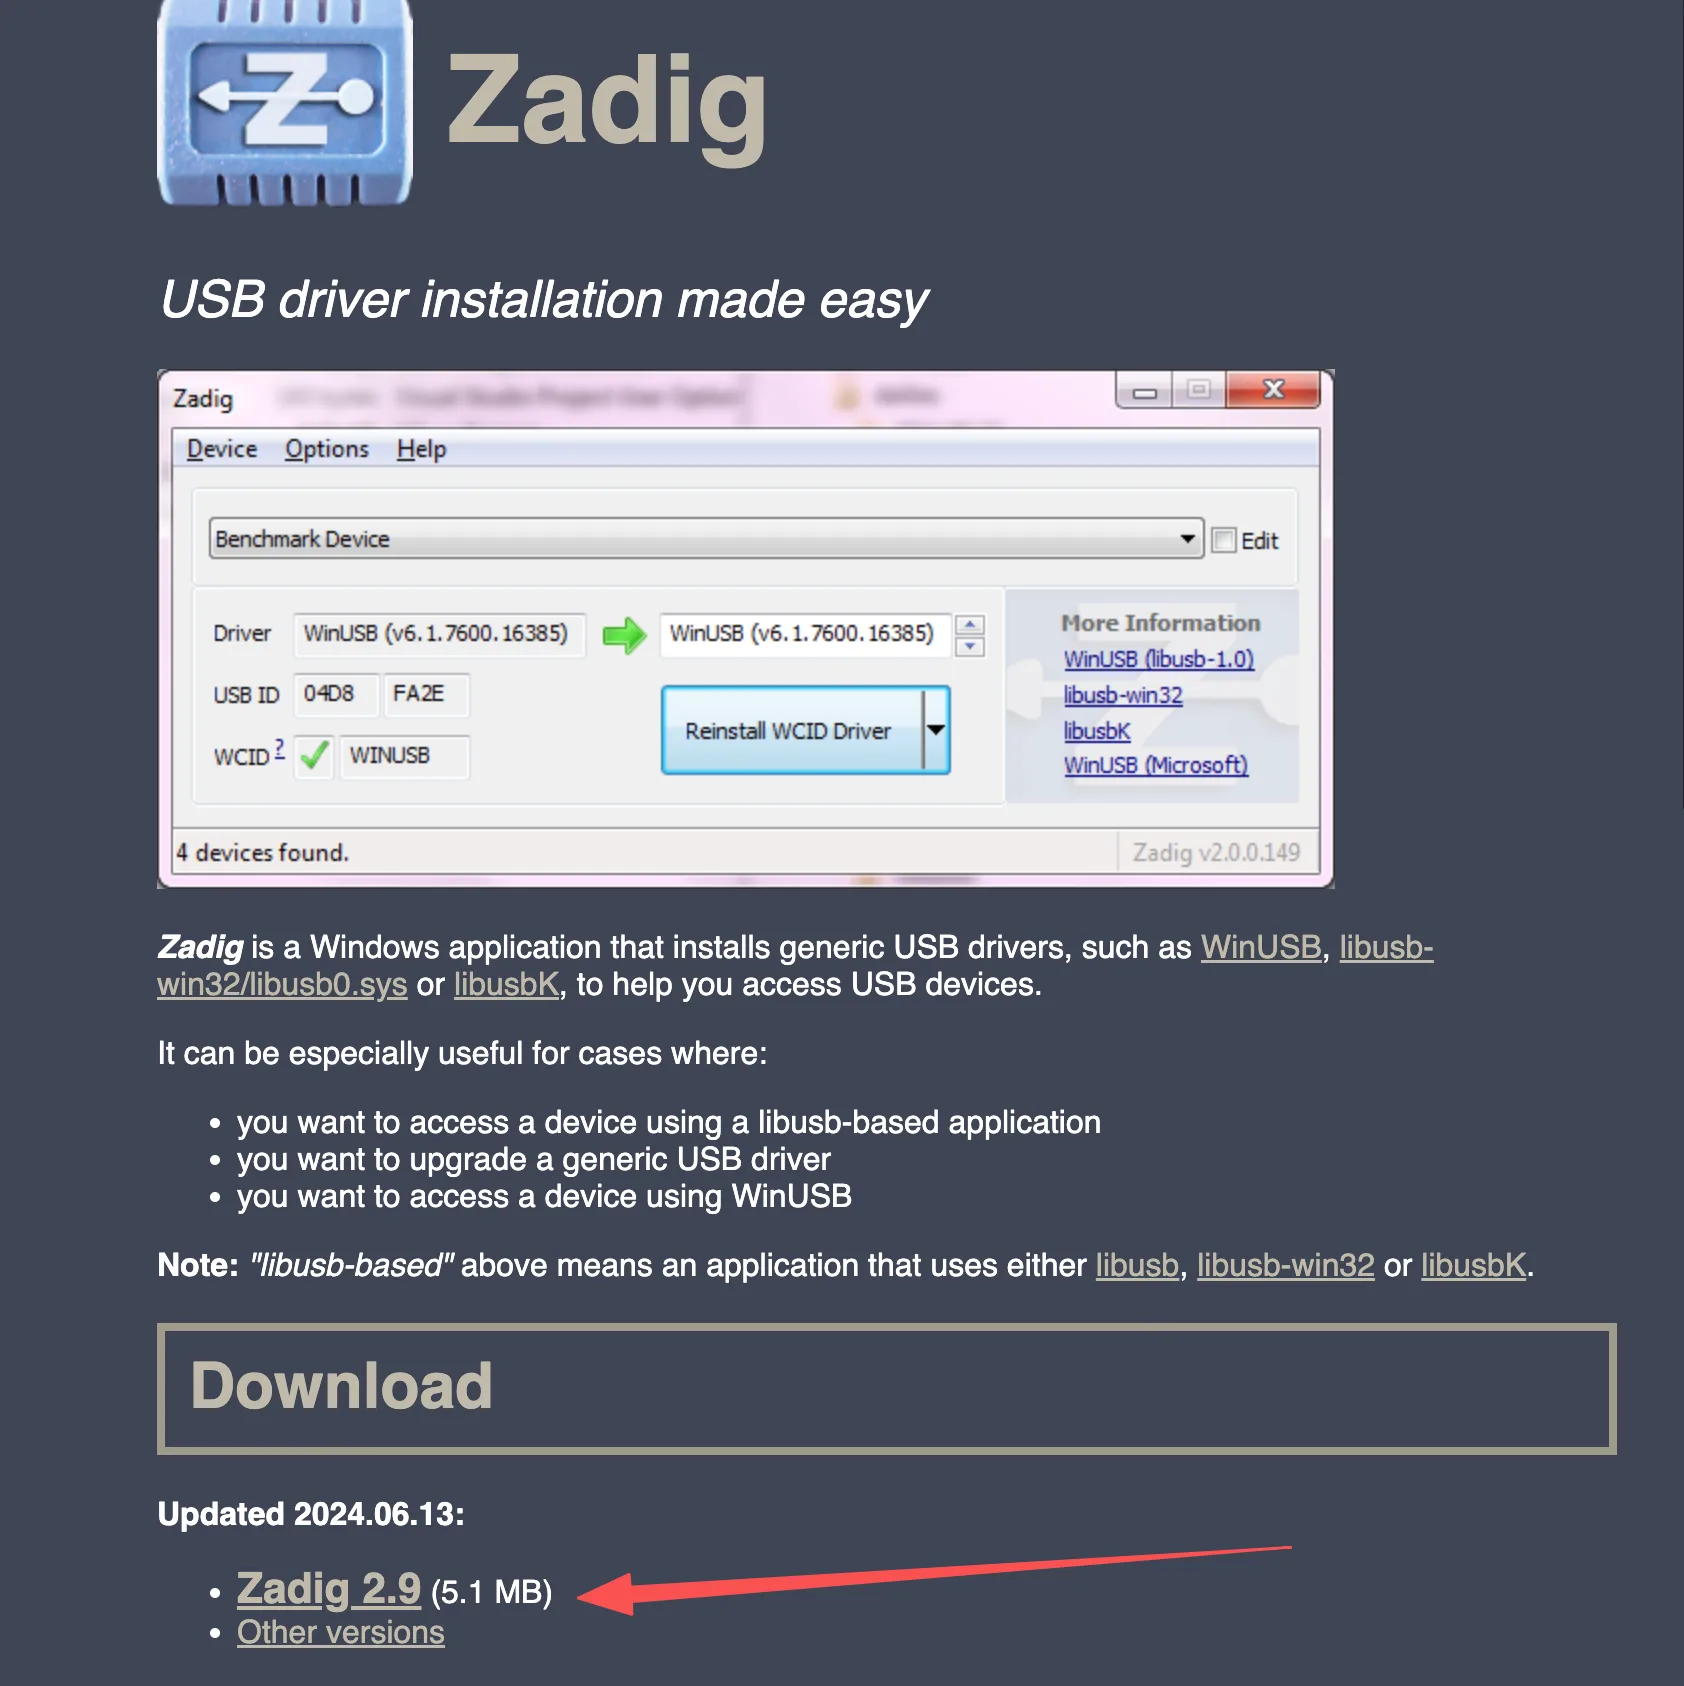
Install Zadig before flashing. Zadig is used to install the DFU driver for the flight controller. Refer to the image below for the download location.
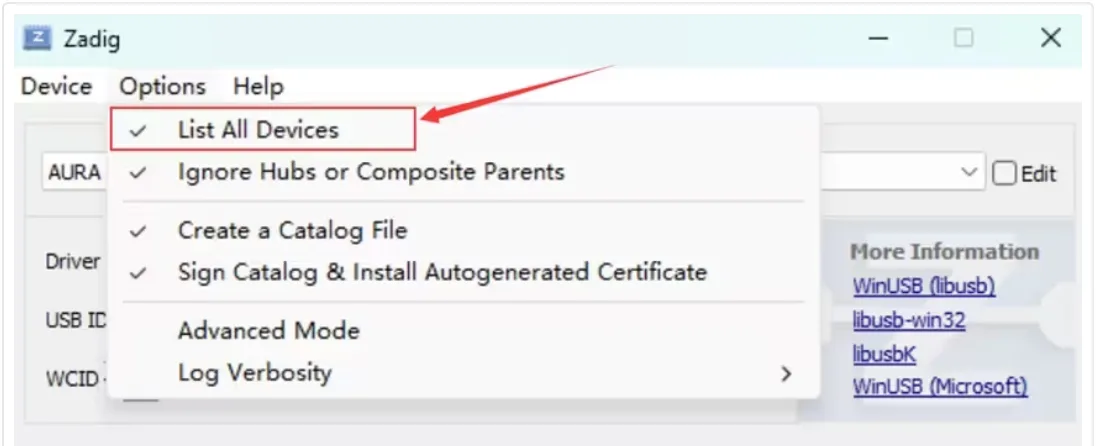
Open the Zadig download entry in the upper-right corner of the page. After running Zadig, enable List All Devices in the Options menu.
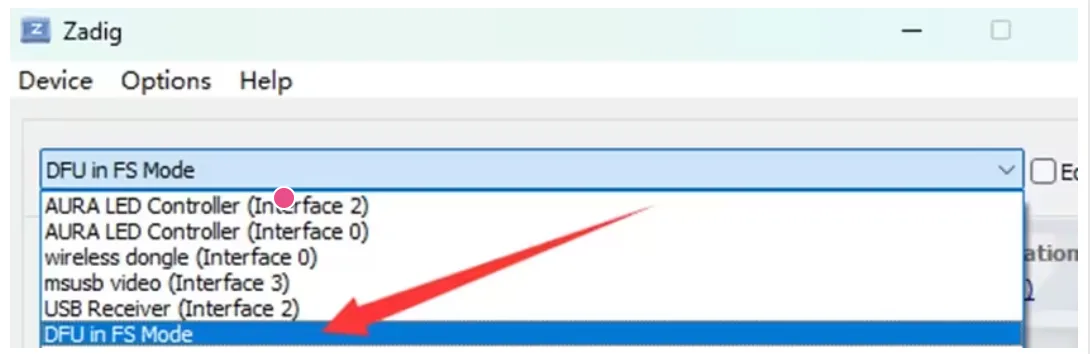
Open the device list and select DFU in FS Mode. If the flight controller MCU is STM32F405, the device name may appear as STM32 BOOTLOADER. If the device cannot be found in the list, make sure the BOOT button was held before plugging in USB, and check that the USB cable supports data transfer.
Click Install Driver to install the WinUSB driver.
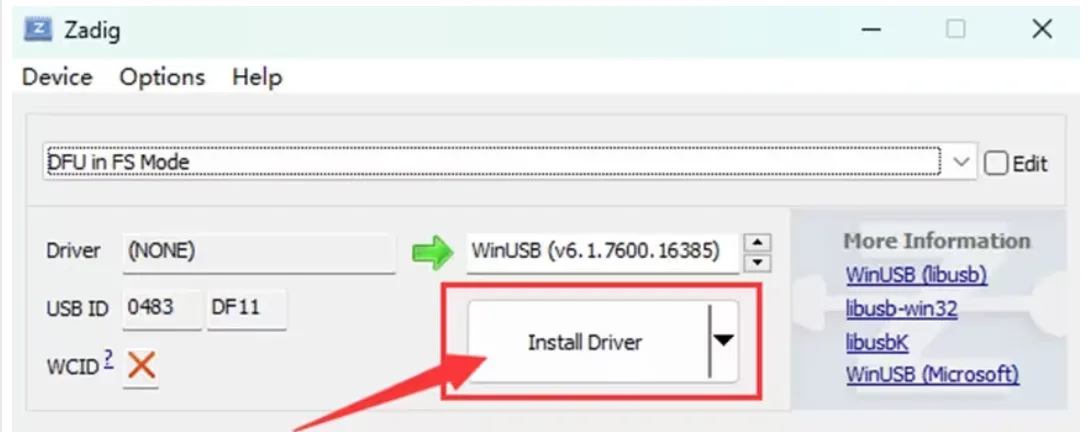
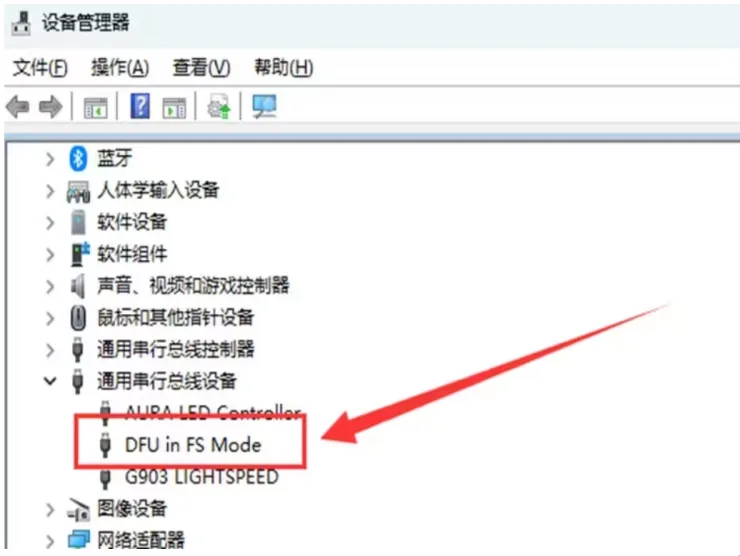
Wait a few minutes. After the driver installation is complete, open Windows Device Manager. If DFU in FS Mode is visible, the computer has correctly recognized the flight controller in DFU mode.
After the flight controller enters DFU mode, follow the steps below to flash PX4 firmware.
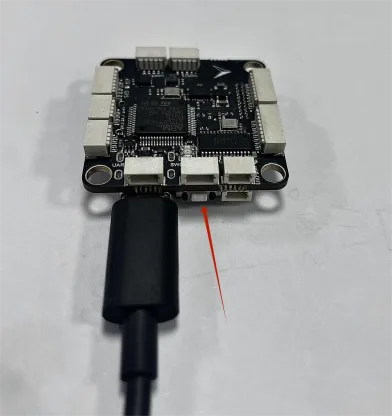
Prepare the CORVON flight controller and a USB-A to USB-C data cable.
Open the online flashing page. Hold the BOOT button next to the flight controller USB port first, then plug in the USB cable to connect it to the computer. Release the button about 2 seconds after the flight controller powers on. Then select the target flight controller and PX4 firmware in sequence, click Flash, choose the recognized DFU device in the pop-up device selection window, and wait for flashing to complete.
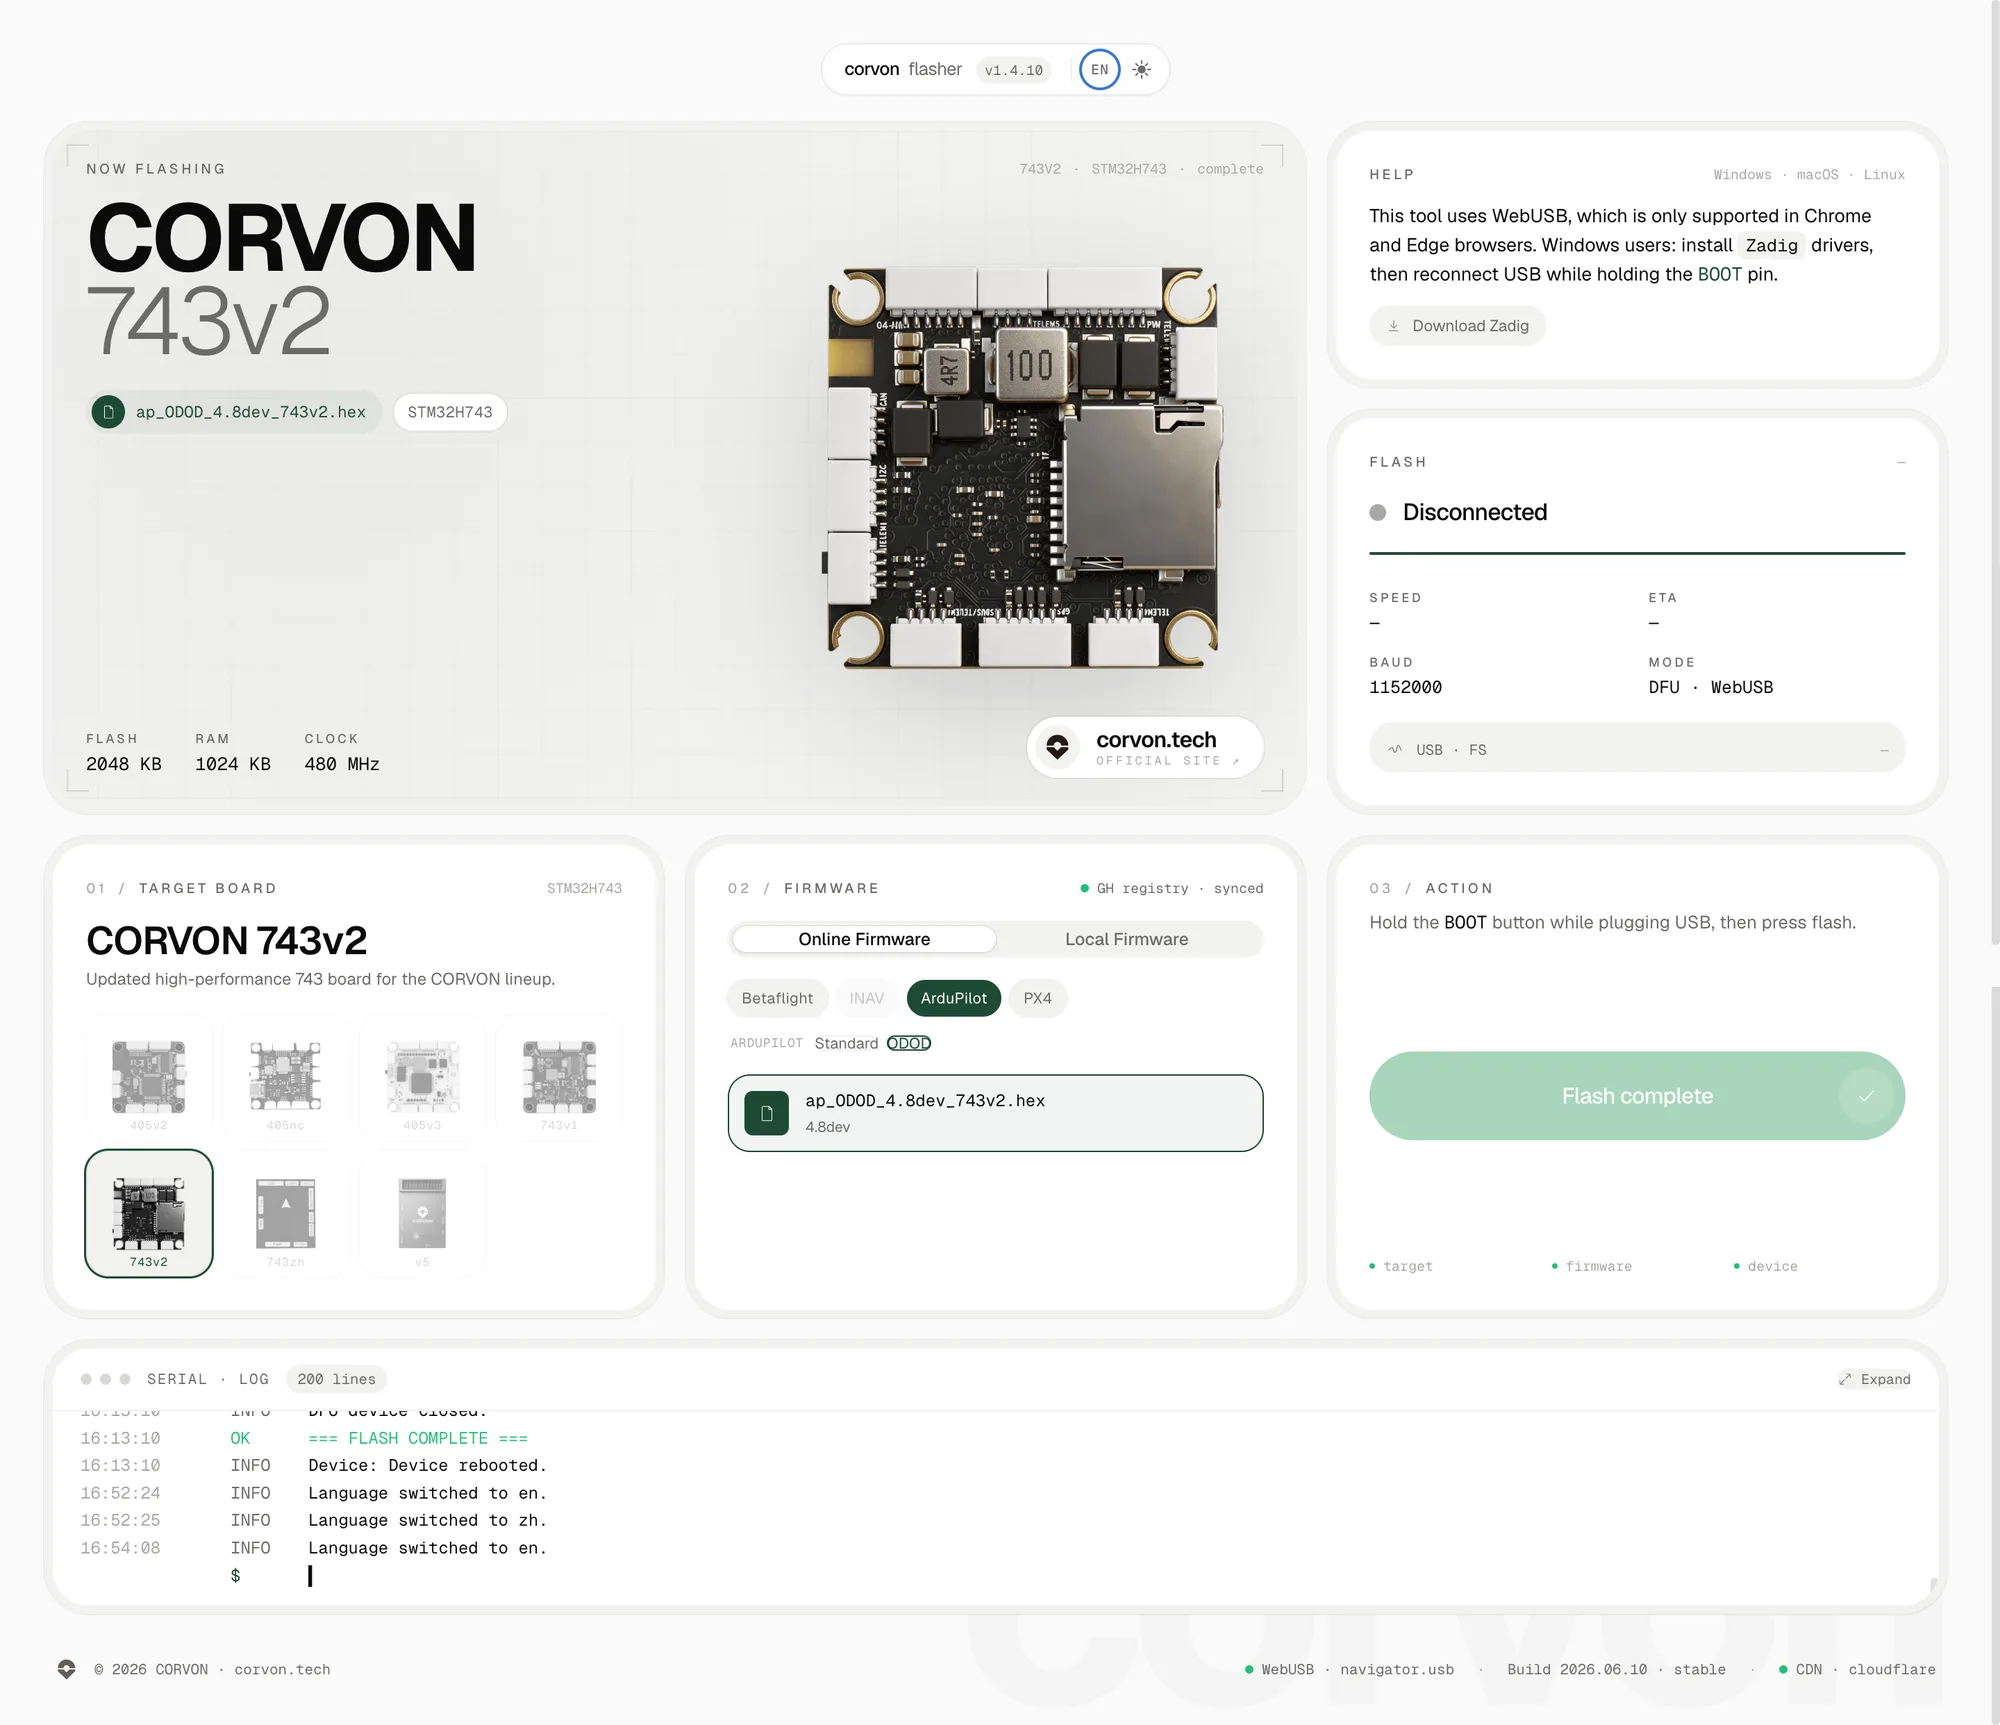
The firmware on the online flashing page is continuously updated. Use the version displayed on the page as the reference.
PX4 Basic Tuning
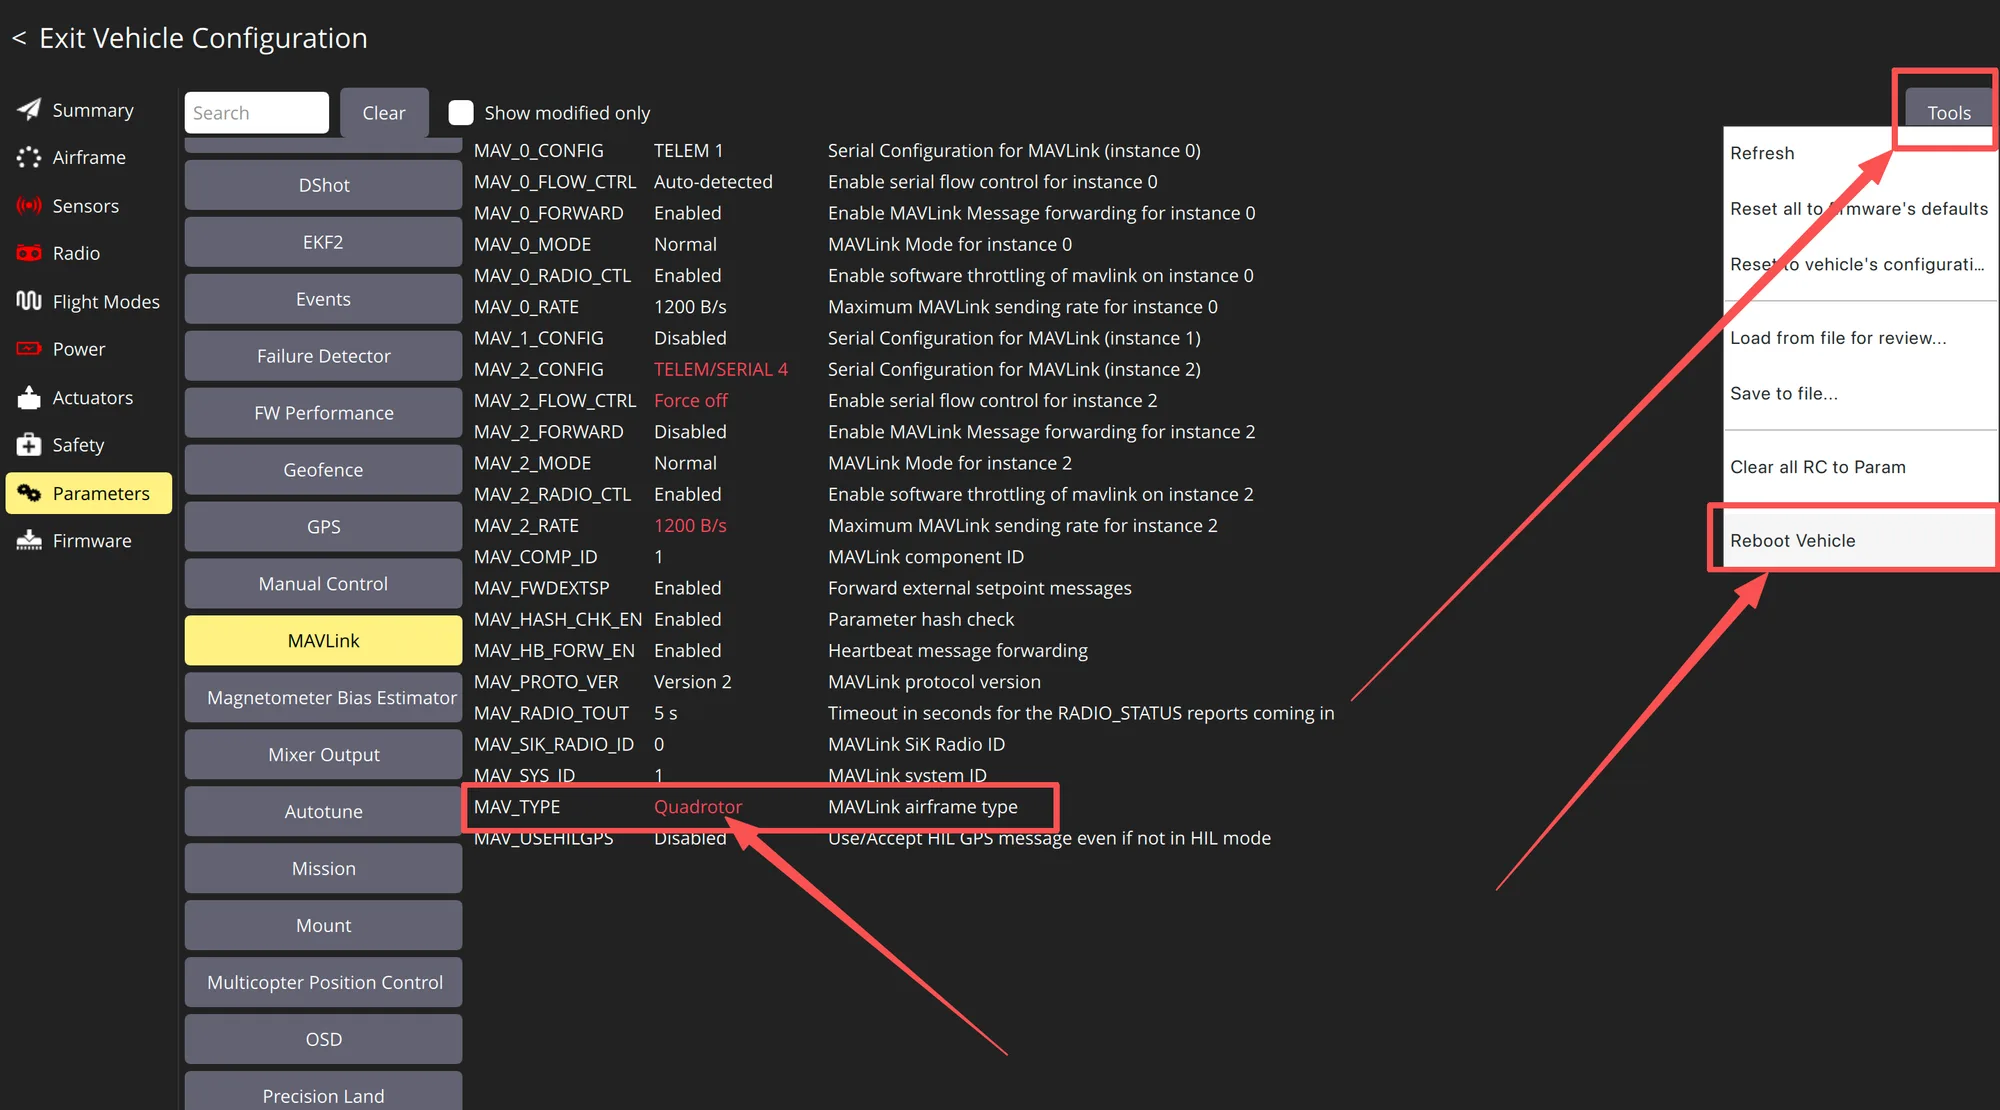
Set the airframe: enter Exit Vehicle Configuration in QGroundControl. In the Parameters page, find MAV_TYPE under MAVLink and set it to Quadrotor, or select the airframe type that matches the aircraft. After selection, use Reboot Vehicle under Tools in the upper-right corner to restart the flight controller, so PX4 loads the basic parameters for the selected airframe.
Enter the parameter page and check basic communication parameters: the screenshot shows the Parameters page. Beginners should not modify parameters in batches. Only confirm whether the MAVLink, serial port, and receiver-related items mentioned in this guide match the firmware default configuration.
MAVLink parameter check: the MAVLink parameters shown in the screenshot are used to configure telemetry and ground station communication. In general, keep the default settings. If TEL4, Bluetooth, or telemetry is used to connect to QGC, confirm that the corresponding MAV_x_CONFIG and baud rate match the hardware connection.
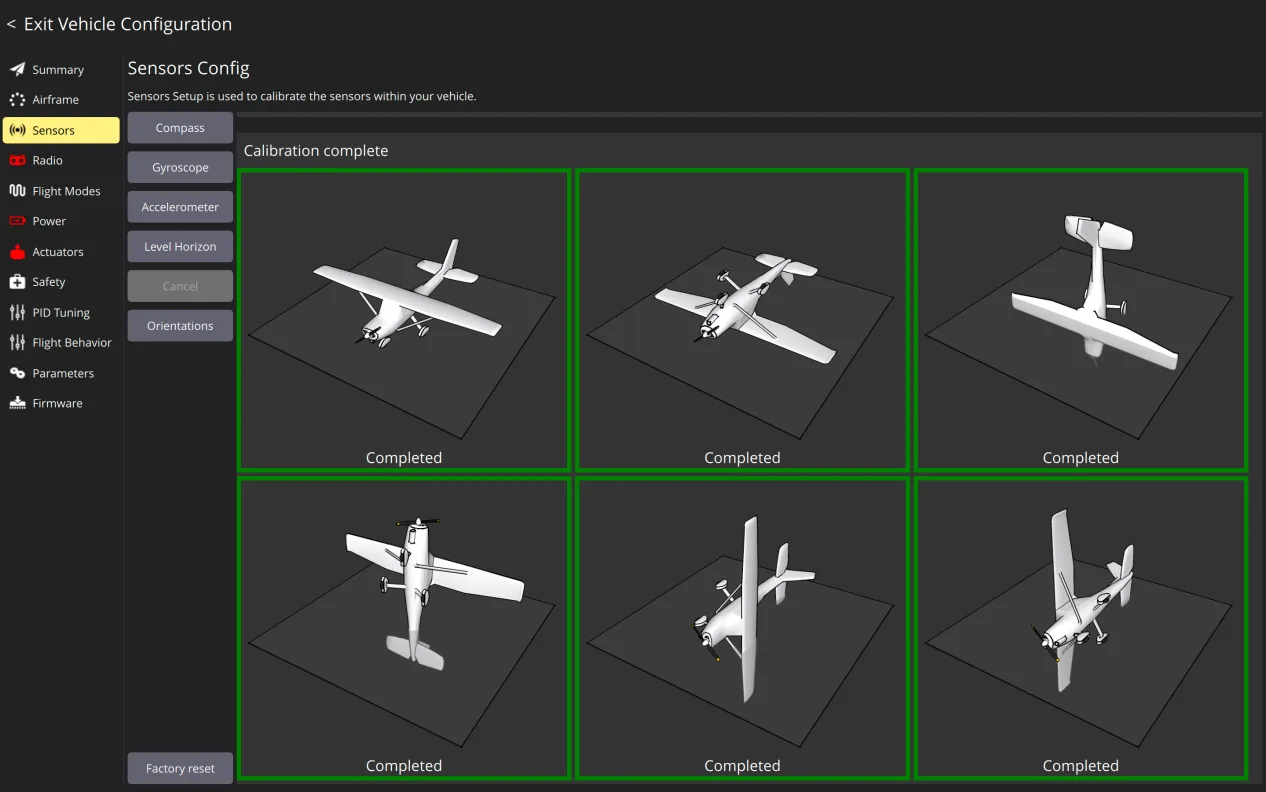
Sensor calibration: enter the Sensors page and follow QGroundControl prompts to complete gyro, accelerometer, level, and compass calibration. Keep the aircraft stable during calibration. Compass calibration should be done away from computers, power cables, screwdrivers, and large metal objects.
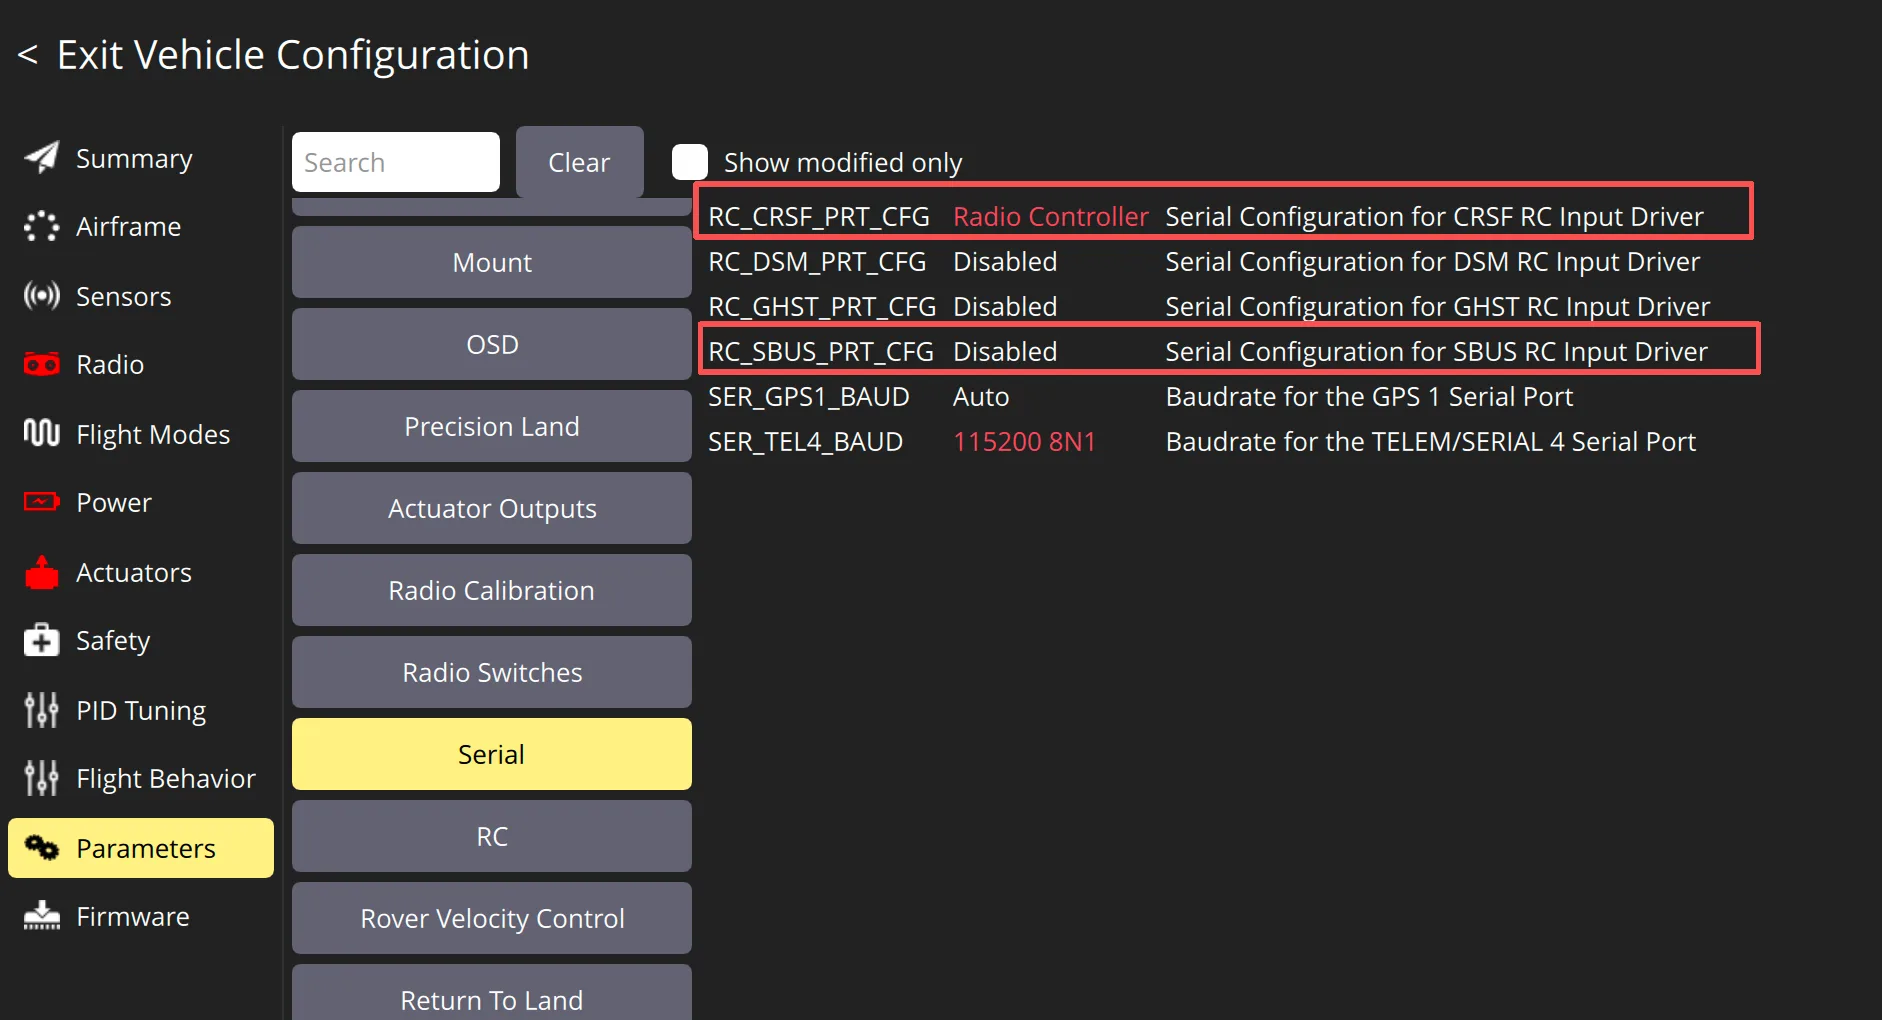
Receiver parameter check: on the Serial / RC related pages under Parameters, confirm the receiver protocol and serial port configuration. Connect the receiver to the flight controller SBUS / CRSF port.
ELRS protocol:
RC_CRSF_PRT_CFG=RadioController
RC_SBUS_PRT_CFG=Disabled
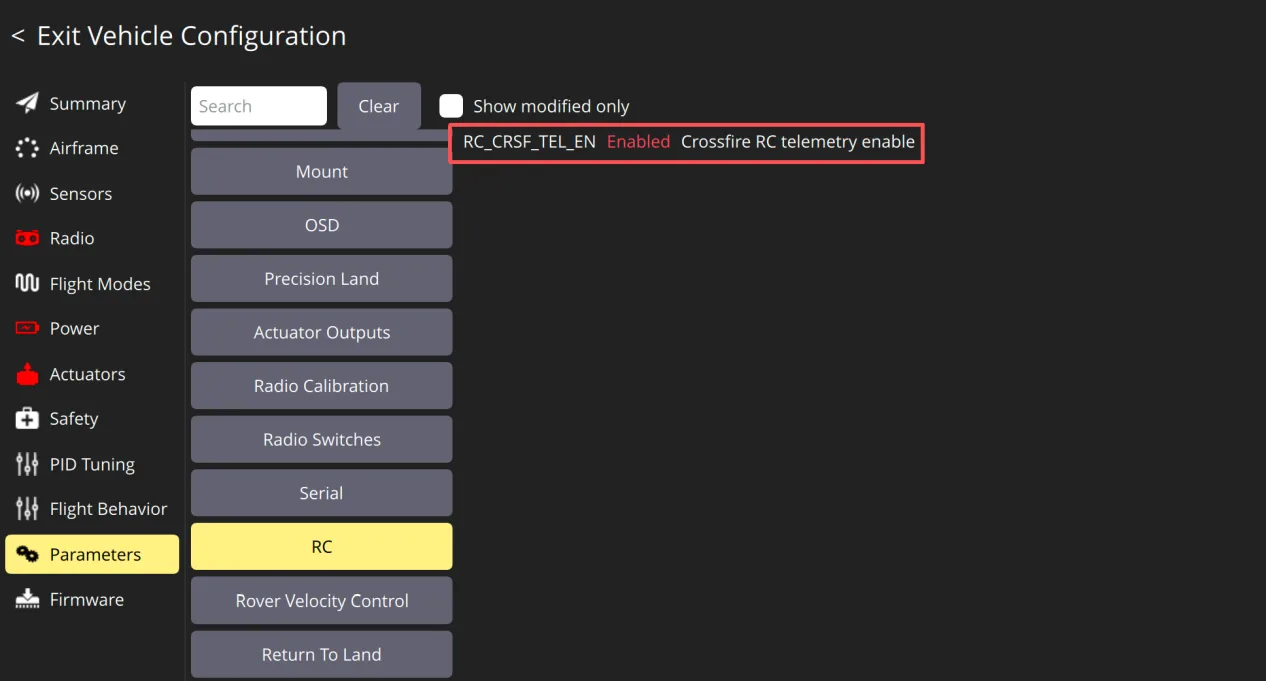
Reboot the flight controller
RC_CRSF_TEL_EN=Enabled
Reboot the flight controller
SBUS protocol:
RC_SBUS_PRT_CFG=RadioController
RC_CRSF_PRT_CFG=Disabled
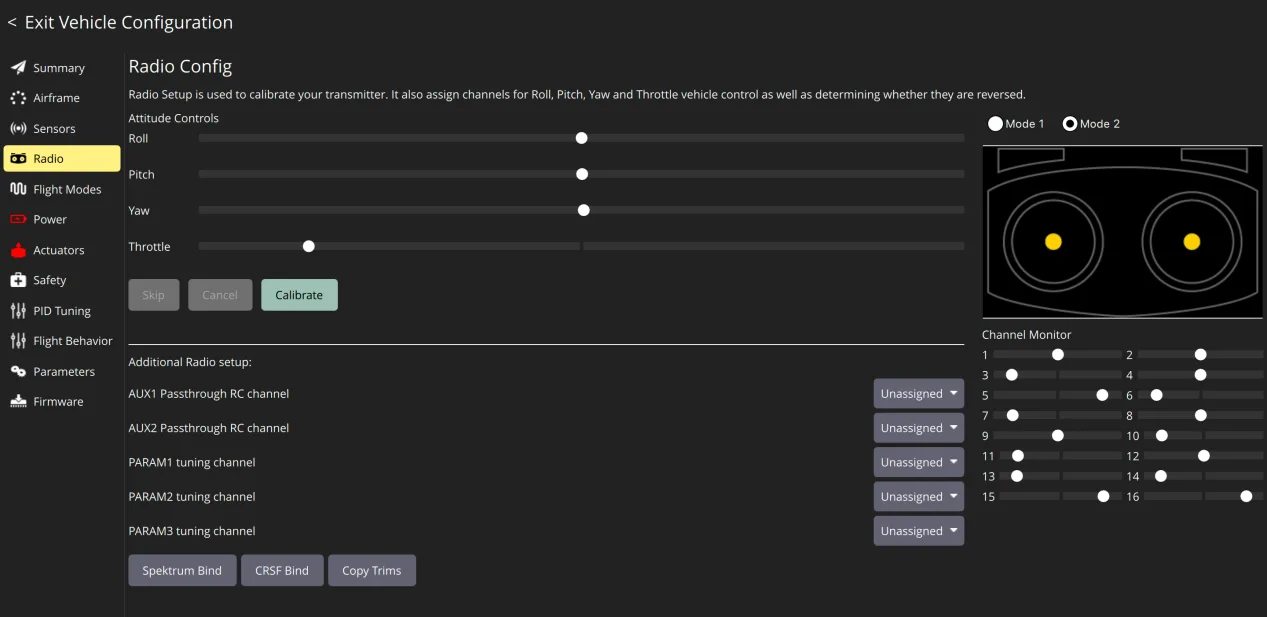
Radio calibration: enter the Radio page, follow the wizard to move sticks and toggle switches, and confirm that Roll, Pitch, Yaw, and Throttle directions are correct and channel travel is normal. After calibration, check the arm switch and mode switch again.
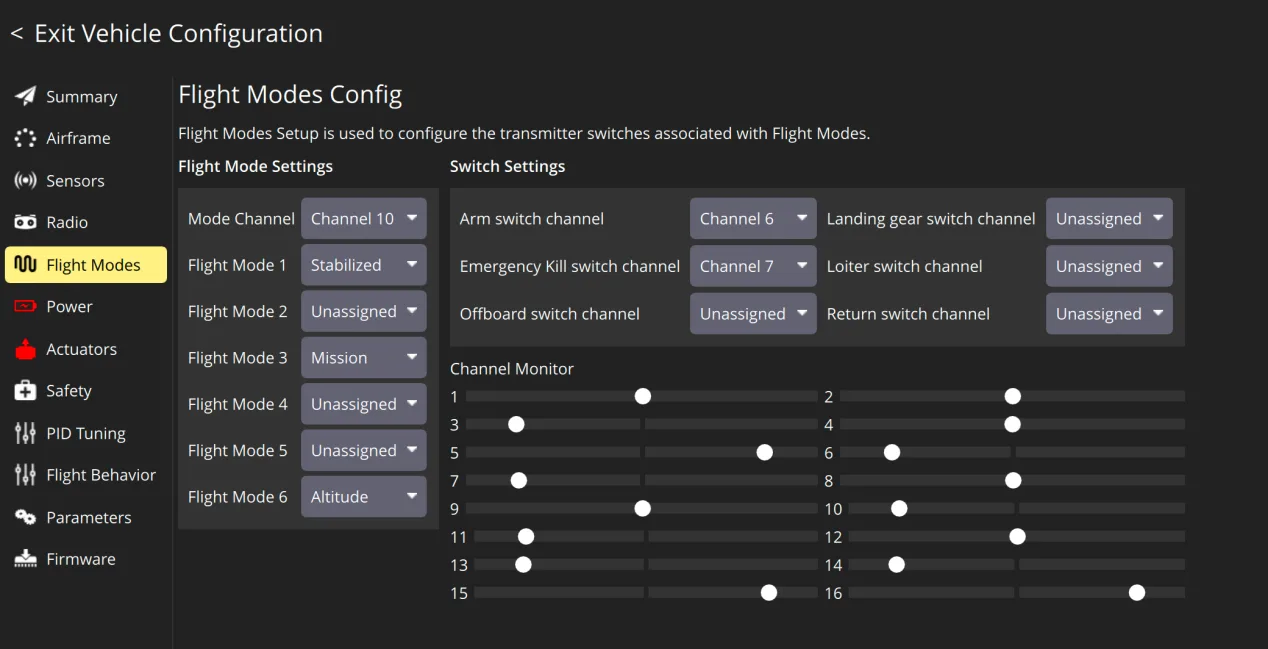
Flight mode setup: enter the Flight Modes page and assign Arm, Stabilized, Altitude, Mission, Return, and other modes to transmitter switches. For a beginner first flight, use Stabilized or Altitude first and do not rely directly on Mission.
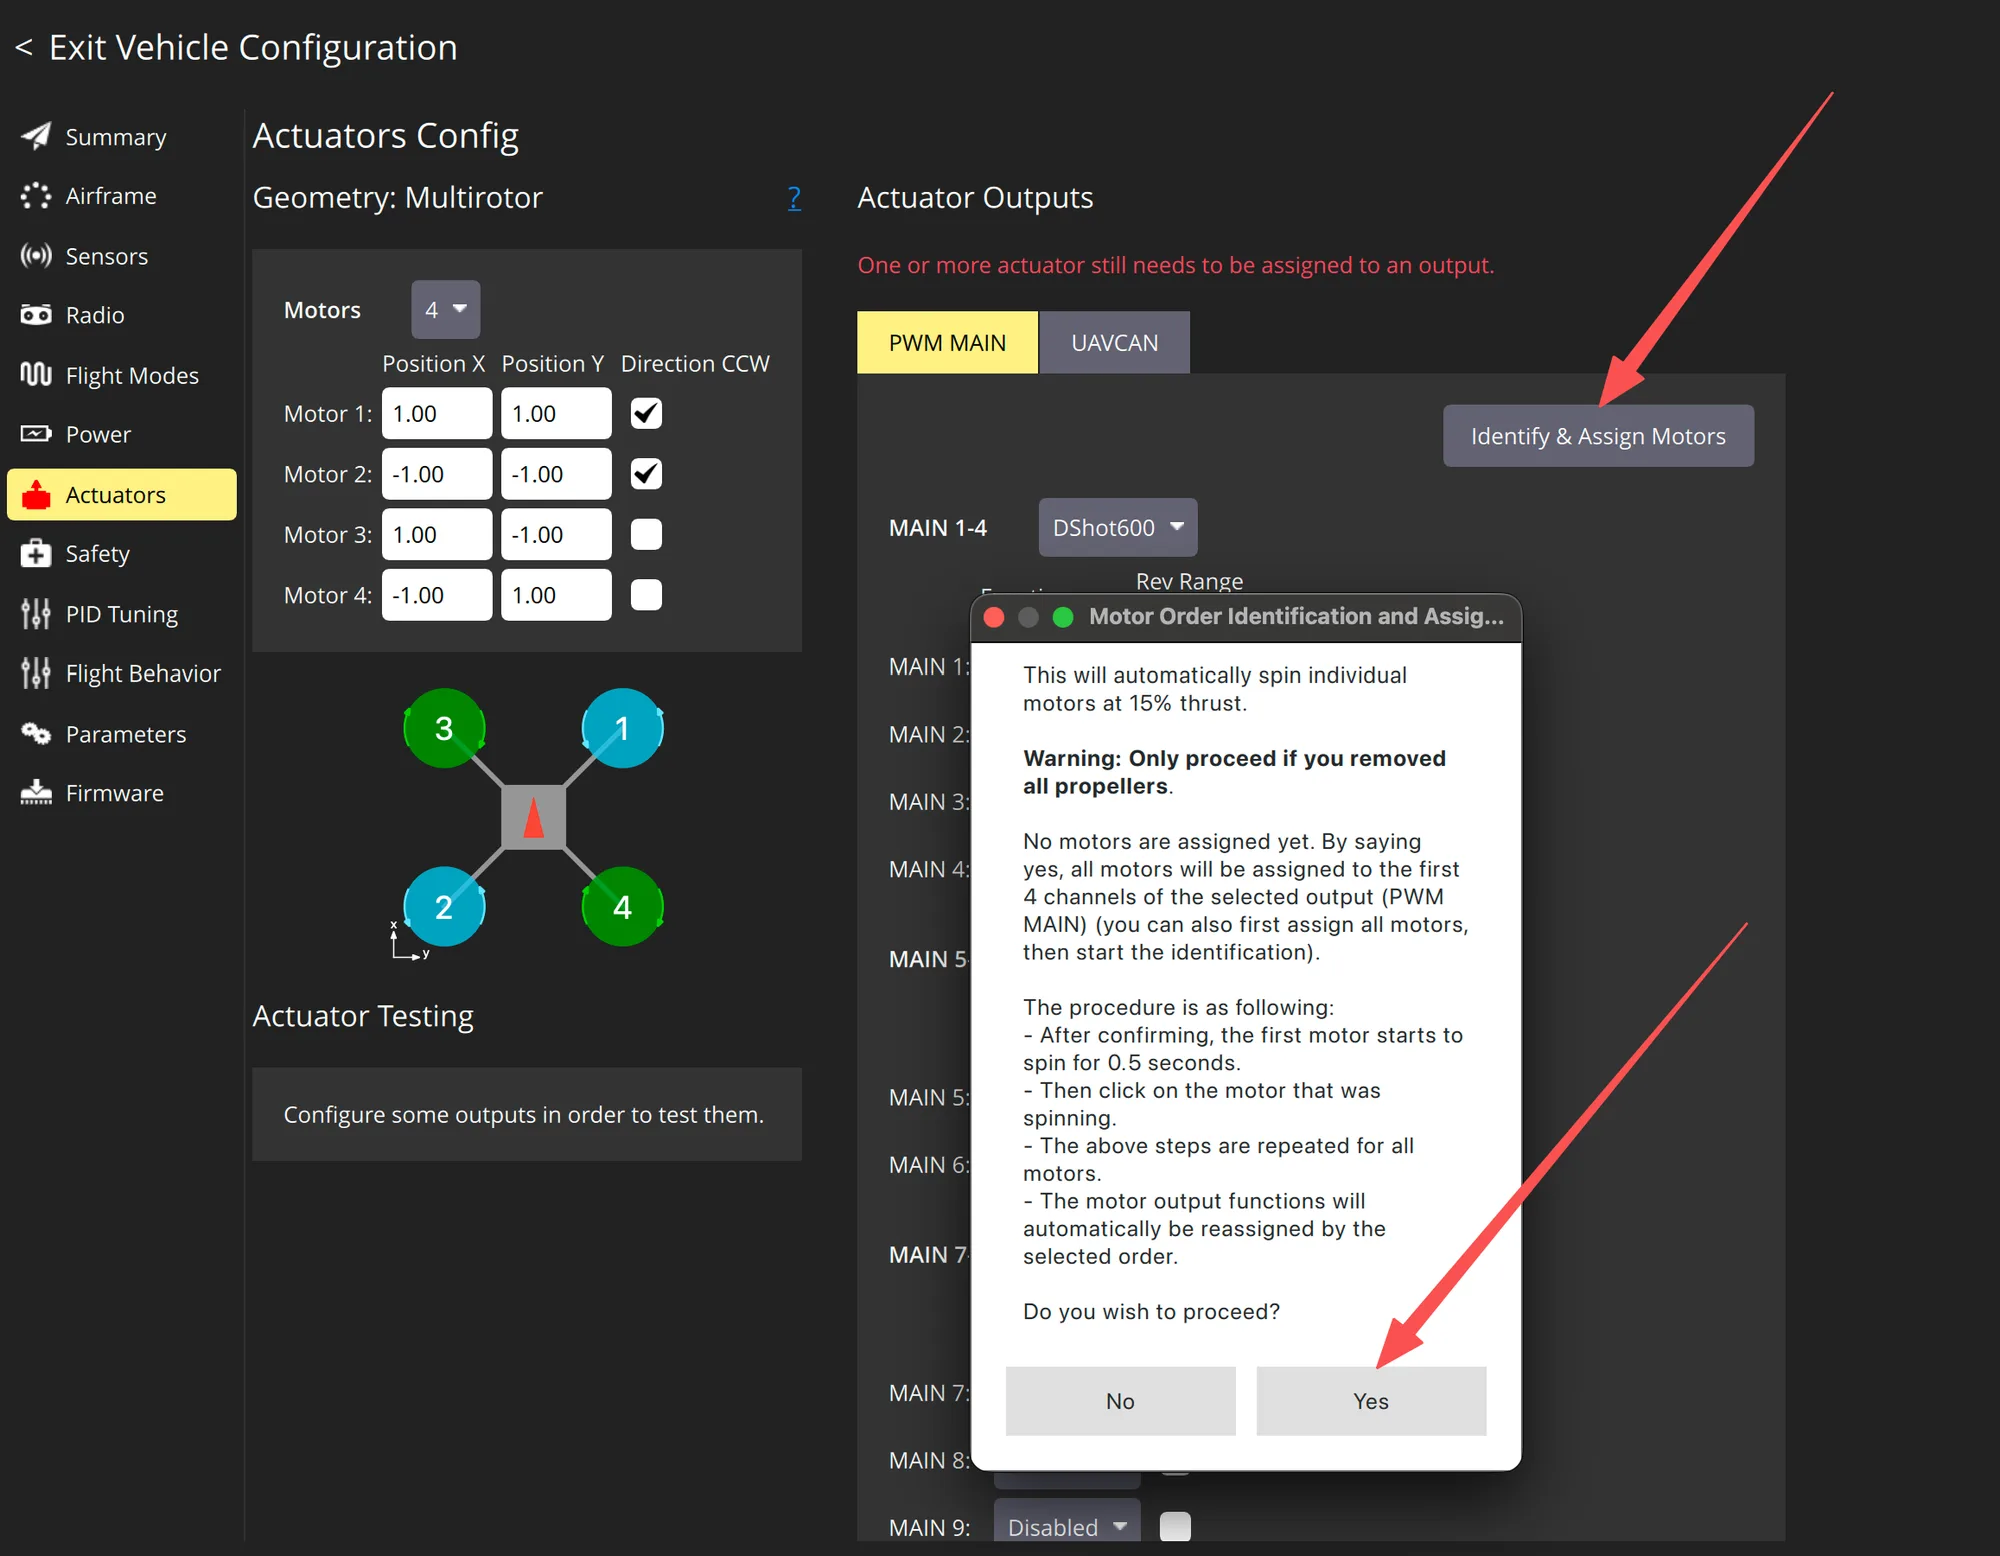
Actuator output assignment: on the Actuators page, check airframe geometry, motor count, and output channels. Propellers must be removed before using Identify & Assign Motors. Follow the prompts to confirm each motor position one by one.
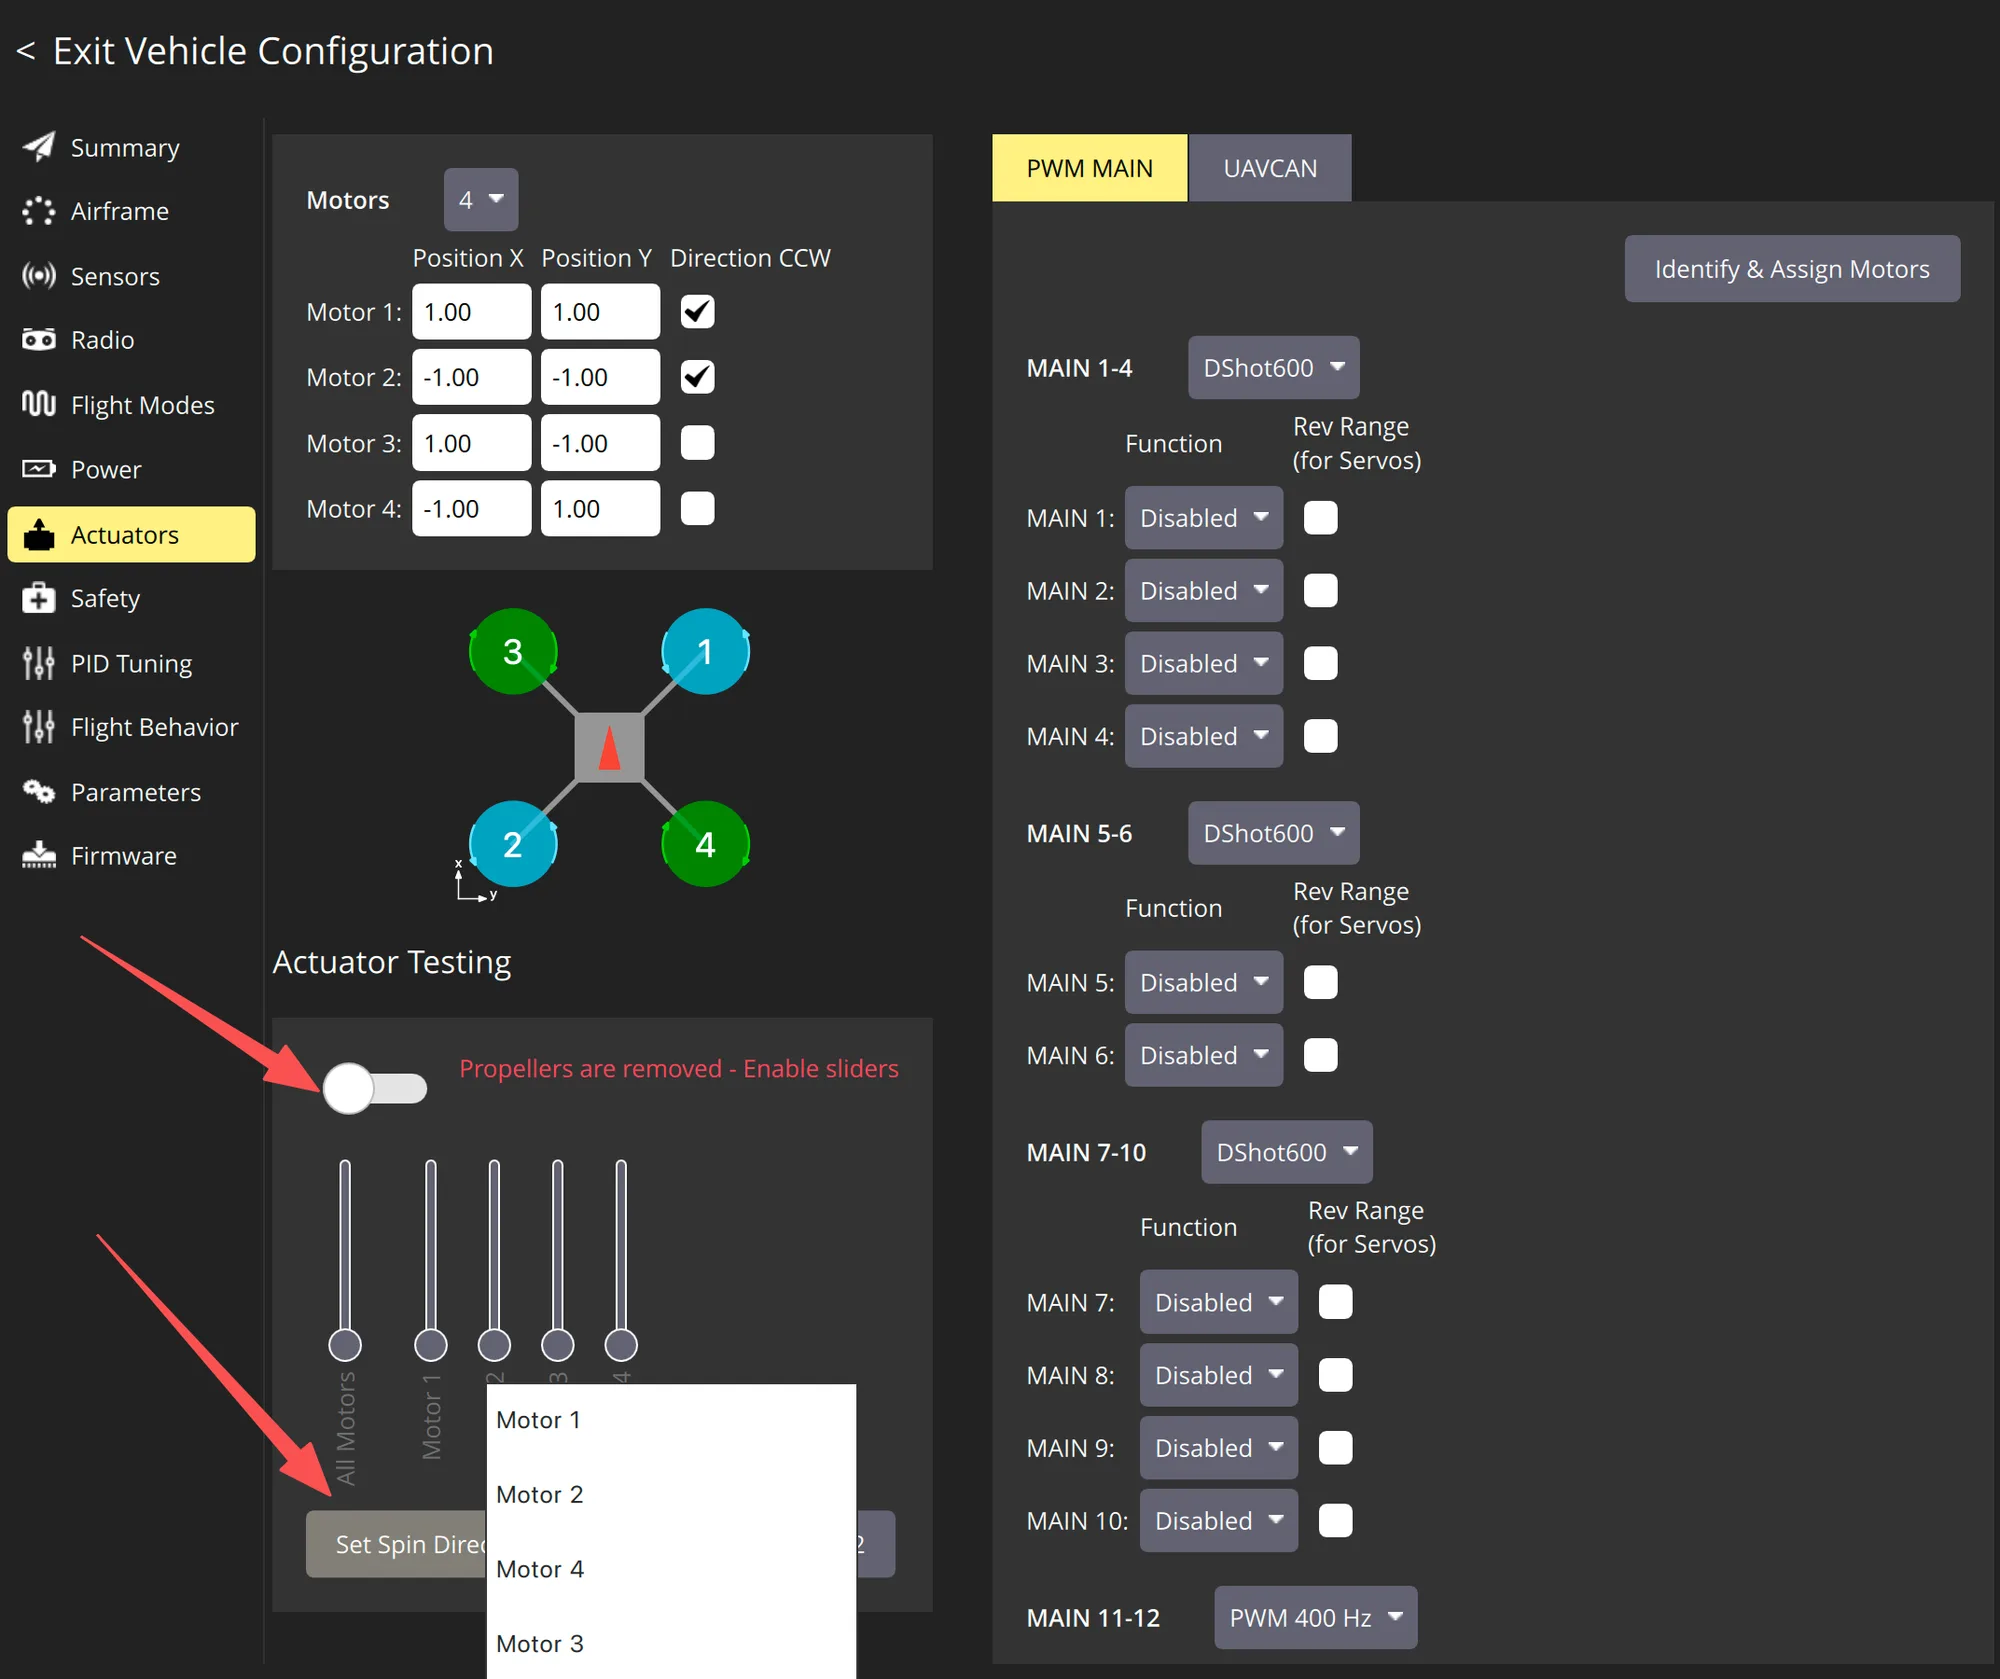
No-prop motor test: after entering the Actuators page, first confirm that all propellers have been removed, then enable the test sliders. Test each motor one by one and confirm that motor number, position, and rotation direction match the diagram.
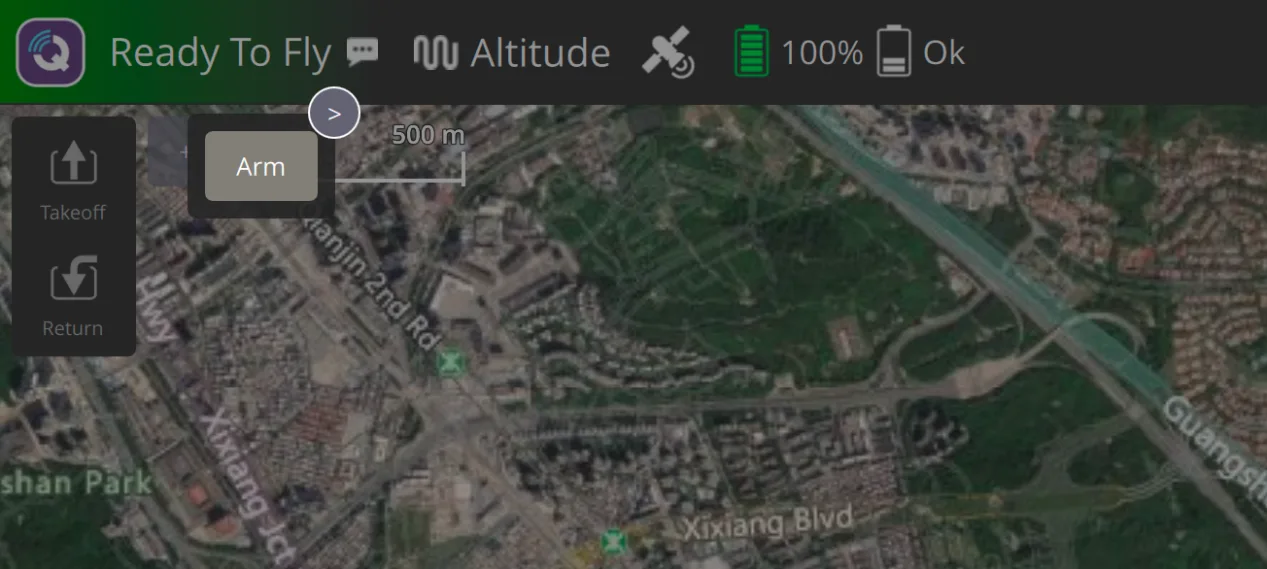
Ready To Fly status confirmation: after all calibration, radio, flight mode, motor output, and safety checks are complete, the top of the main interface should show Ready To Fly. Before the first flight, it is recommended to arm manually and hover briefly; do not start with automatic missions or return functions.
PX4 Beginner Startup Flow
The following flow follows the actual tuning order. PX4 places more emphasis on a complete loop of sensors, radio control, flight modes, actuators, and safety logic. Beginners should not rush to install propellers before the first flight. First confirm connection, correct attitude, receiver response, failsafe stop, and correct motor and propeller directions, then proceed to takeoff.
Pre-build safety check: confirm that the flight controller arrow, mounting orientation, and nose direction are consistent. Do not reverse power polarity, and make sure solder joints are not cold or bridged. Connect the receiver, GPS, telemetry, video transmitter, and ESC signal wires to the correct ports. Propellers must be removed at this stage, and all later motor tests must also be done without propellers.
Flash and connect the flight controller: use the CORVON online flasher to flash the corresponding PX4 firmware. After flashing, power cycle the flight controller, open QGroundControl, and wait for the ground station to automatically recognize the flight controller. If it does not connect automatically, first check the USB cable, driver, and serial port occupation.
Select the airframe: on the Airframe page, choose the airframe type that matches the aircraft. For a quadcopter, select the corresponding Quad. For a fixed wing, select the corresponding Plane / Airframe. Restart the flight controller as prompted after selection.
Complete sensor calibration: enter the Sensors page and complete gyro, accelerometer, level, compass, and other calibrations in sequence. For six-side calibration, place the airframe as prompted by the software and change orientation only after each step is complete.
Configure receiver and radio: confirm that the receiver is connected to the correct serial port, and select the corresponding RC input protocol in Parameters. Enter the Radio page to complete transmitter calibration, and confirm that Roll, Pitch, Yaw, and Throttle directions are correct and travel is normal.
Set flight modes and arm switch: on the Flight Modes page, set the Arm switch and commonly used flight modes. Beginners are advised to configure at least Stabilized, Altitude, and Return. For the first takeoff, use Stabilized or Altitude and do not use Mission automatic tasks yet.
Set safety protection: enter the Safety page and check failsafe, low-voltage protection, and Return behavior. For aircraft with GPS, rely on Return only after confirming stable positioning and normal Home point generation. Do not treat automatic return as the safety fallback before completing GPS / compass checks.
Check actuators and motors: keep propellers removed, connect the battery to power the ESCs, enter the Actuators page, and identify and test motors one by one. Motor number, position, and rotation direction must match the QGC diagram. If the order or direction is wrong, correct it first in actuator / ESC settings.
Install propellers last: install propellers only after all no-prop tests are complete. Do not install propellers upside down or on the wrong motor; motor direction and propeller direction must match. After propellers are installed, do not test throttle on a desk. Any test with propellers installed must be done in an open area.
Final pre-flight check: the field must be open and away from people, vehicles, and high-voltage lines. Make sure the transmitter has enough battery, the aircraft battery is secured, and the arms, screws, and propellers are tightened. If the main interface does not show Ready To Fly, handle the warning first and do not force takeoff.
First takeoff: place the aircraft on level ground with the tail facing you. Arm in Stabilized or Altitude mode first. Slowly raise throttle and hover 1 to 2 meters above the ground. Do not fly far at the beginning. After confirming there is no obvious flipping, drifting, shaking, or abnormal motor sound, make small forward, backward, left, and right movements, then land slowly. After landing, disconnect power and check motor temperature, propellers, screws, and frame before deciding whether to continue flying.
Beginner Quick Check
First confirm that the USB cable supports data transfer, then check the driver, serial port occupation, and whether the flight controller is powered normally. For DFU flashing, hold BOOT before plugging in USB.
Keep the airframe stable during calibration and place it in the prompted orientation. Compass calibration should be done away from strong magnetic environments and large metal objects.
Check whether the receiver is bound, whether the serial port and RC input protocol are set correctly, then redo Radio calibration.
First check the warnings at the top of QGroundControl and unfinished items in Vehicle Setup. Common causes include uncalibrated sensors, GPS / Home not ready, radio not calibrated, throttle not at minimum, or safety switch not released.
First identify motor positions again on the Actuators page, or correct direction in ESC / actuator settings. Do not compensate for wrong rotation by installing propellers incorrectly.
First perform motor and mode checks without propellers, then do a short low-altitude hover in an open field. The focus of a PX4 first flight is to verify attitude, radio control, modes, and safety logic, not to fly far.